Showing posts sorted by relevance for query Tips & tutes/. Sort by date Show all posts

13 October 2014

Krafty Tips & Tutes - Week #35: Adding a twist to those flowers!

Welcome to another week of Krafty Tips and Tutes here at Kraftin' Kimmie Stamps!  Each week one of our fabulous Krafty Girls share a little post with some sort of tip or tutorial for you and we hope you find them inspirational! 

This week our hostess is Krafty Girl, STEPHANIE!!  And she's prepared a quick and simple tutorial on how she uses flowers on her cards and adds a little edge to them! Enjoy the tutorial and then we'd love to see YOUR creations featuring this technique with your Kraftin' Kimmie Stamps!!  Be sure to SHARE them over at our new Krafty Friends facebook page!!  We'd love to see you there!!


Hey everyone, Stephanie's here to show you a rather simple way to use those flowers we all have in our stash.

First tip is to cut them in half, add a glue dot or a small amount of liquid glue in the center, and then place each half between your layers (it'll make them pop even more!).


I also often use a pen, a stylus or something circular to fold the long stems of those cute flowers we all have!


And here are a couple of cards I made featuring stamps from the shop with this technique:


Easy, right? Just use it here and there and you'll feel happier with your stash of flowers, I promise! 
 Thanks for being with us on the Krafty Tips & Tutes!

16 March 2015

KRAFTY TIPS & TUTES - ALTERED AGENDA ON VIDEO!

Welcome to another week of Krafty Tips and Tutes here at Kraftin' Kimmie Stamps!  Each week one of our fabulous Krafty Girls share a little post with some sort of tip or tutorial for you and we hope you find them inspirational! 

This week our hostess is Krafty Girl, STEPHANIE!!  And she's prepared a quick and simple tutorial on how to alter a basic agenda and make it glamorous! Enjoy the tutorial and then we'd love to see YOUR creations featuring this technique with your Kraftin' Kimmie Stamps!!  Be sure to SHARE them over at our new Krafty Friends facebook page!!  We'd love to see you there!!


Hey everyone, Stephanie's here to show you a rather simple way to alter an agenda with few embellishments but a big wow effect! I used the Leilani stamp with gorgeous DP to put a smile on my mom's face everytime she looks up her agenda :)


Watch it all here!


Easy, right? It's basically taking out the regular cover, covering it with cardstock, punching holes for the binding ( you can use a Cinch tool or a good old Crop-a-dile!) and then decorating it! 
 Thanks for being with us on the Krafty Tips & Tutes and make sure to subscribe to our YouTube channel!

09 June 2014

KraftyTips & Tutes #21 - Paper Piecing!!

 Welcome to another week of Krafty Tips and Tutes here at Kraftin' Kimmie Stamps!  Each week one of our fabulous Krafty Girls will be sharing a little post with some sort of tip or tutorial for you and we hope you find them inspirational!
 
 This week our hostess is BECKY!!!  And she's prepared a fantastic step by step tutorial with photos showing how she PAPER PIECES on her creations!!!  Enjoy the tutorial and then go get krafty and share your paper piecing with us!!!!
 
Hi, this is 'Krafty Girl' Becky from Cards By Becky...with a Paper Piecing Tutorial.
Paper piecing is great for adding texture, 'dressing' stamp images and so much more!
We will start with the basics and then move on to advanced projects in future posts.
 
SUPPLIES:
Sharp Detail Scissors; Cutter Bee 
Glue; Quickie Glue Pen
Black Pen for Edging; Memento Black Dual Marker
 
 
TIPS:
(a) SCALE: When selecting the patterned paper, it's important to think of pattern scale.
For example, if you select a stripe you want it to show up when paper pieced.
Large patterns are very hard to see when paper pieced.
 
(b) STAMP SELECTION: Choose stamps with areas that have as much space as possible.
It provides room for the paper pieced pattern to be visible.
 
(c) COLOR FIRST: Before paper piecing, complete all of your coloring.
You don't want to color over your paper piecing.
 
(d) SHADING: Once you have glued the pieces down, shade!
Decide where your light source is coming from and apply shading
to add dimension and depth to your paper pieces.
The Copic C and W range work well for shading, as well as pencils.
 
Okay!
Let's get started!
 
Step 1:  Stamp your image and then stamp onto the pattern paper you have selected to paper piece. 
 
Step 2:  Cut out your pattern pieces with detail scissors.
Try to cut just outside of the black edge on the stamped image.
 
 Step 3:  Run a black marker along the edge of the pattern pieces you have cut out,
this will ensure the white edge where you cut the paper will not show.

Step 4:  Color the sections on the stamped image that will not be paper pieced.
Now...you are ready to paper piece!
Select glue that allows time before it dries, then you can move the piece into place as needed.

Thanks for following along!

Wait!  there's more....

 In the future, we will have advanced Tips & Tutorials on Paper Piecing...
 Paper Piecing: 3D Layers and Paper Piecing: Building a Scene!

  Check back here at the {Kraftin' Kimmie Stamps Blog} for upcoming Tips & Tuts!


https://www.youtube.com/channel/UCmKxyN342NSLOlLv_tPHD9Q/

25 April 2016

Tips & Tutes - Masking


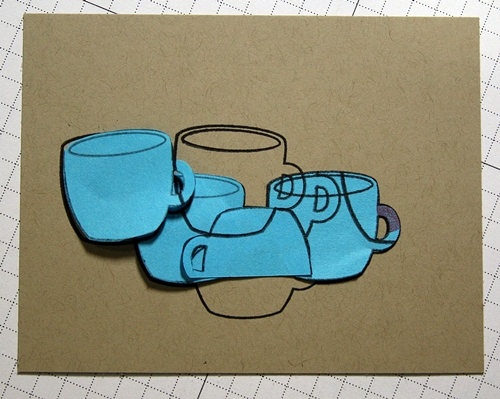
Hey everyone!  Krafty Girl Kelli here with this weeks Tips & Tutes for Kraftin Kimmie Stamps!  We are going to explore Masking!!!!! 

Supplies used:
Memento Jet Black Ink, Scissors, Sticky Note and One Cup at a Time stamp set


Stamp your image onto your cardstock and then again on to your sticky note, making sure the sticky part has inked image on it to help hold it down.


Cut out the image from the sticky pad.  **TIP** Turn your card stock not your scissors.  Also make sure you get in the small areas as it's the little details that become big eyesores later.  I used my exacto here and actually kept the blade on the image area being cut and turned my exacto, allowing it to roll in my fingers.


I stamped the little heart randomly on the card you can see part of the heart peeking out from the handle opening! :)


Now you can also build up an image using masking.... You will need several masks for this, I made 3 1/2 LOL  Just needed a little piece for one.  **TIP** ALWAYS stamp the image that you want in the front first


Then color your image and here is a nice set of Cuppa Coffees!  Looks like a GOOD day!  lol

Notice the (very glittery) purple cup on the right?  See the cup peeking out of the handle area of the green cup?  See, it's the little details.


So, whether you want a simple masking or a detailed pile of stuff.... masking is your friend and SO super easy!!!! 


Thanks so much for popping in and I'd LOVE to see your masking cards.  The last couple of releases lend to masking cards and you can create GORGEOUS scenes so simply!!!!

Krafty Kisses!

KJ

26 January 2015

Krafty Tips & Tutes #49-Candy Bar Holder

Hey Krafty Friends and Family, Jessie here! Welcome to this week's Krafty Tips & Tutes. I don't normally do anything that requires a tip or a tute, but these are so easy, and fun, you can't help but want to make them. :)


Ok, so....start out with a piece of 6x7 cardstock of any color you want, and score at 3" and 6".


Fold at score lines, then add red line tape, or whatever super sticky, amazing tape you use, along the the edges shown, and the small inside edge of the 1" folded flap. Glue together.


Once you have the edges glued together and secure, punch a hole at the top going through both sides. You can use a large round hole punch, or a slit punch, up to you.


Take a piece of ribbon of your chosing, I chose Lemon Drop grosgrain from MFT, and feed it through the hole, then make it the same length on both sides, about the length of your candy bar(who knew they had M&M candy bars??). The ribbon is being used to pull the candy bar in and out of the wrapper, so you want it to be pretty snug. 


If you want, you can go ahead and push the candy bar all the way in, then tie the ribbon at the top, so you know the length is perfect. See....easy. Now that your holder is done, you can decorate as you want.


 I chose to use the Make A Wish set. I cut some balloons out using a Balloon Die-namic from MFT, and some Simple Stories paper. I added some hemp cord as the strings for the balloons, and then gathered them together with a Lemon Drop button. To finish I added some brads to my sentiment, and then layered it with Lemon Drop, Wild Cherry, and Nightshift Blue cardstock. 

Well, that is it for me for now!! Hope you enjoyed it! Have a Krafty Day!

30 March 2015

Krafty Tips & Tutes - 1 sketch, 3 ways

Happy Monday Everyone!!!

I am SUPER excited to be sharing with you my 1 sketch, 3 ways Tips & Tutes. I do this ALOT with sketches. They are so versatile and fun to play with and can be played around with to create tons of fun card, pages, or even altered items. Below is my initial sketch.


Using the above sketch I first created the card below using EVER AFTER. I didn't play with the sketch at all on this one. I took what I created and made an exact duplicate. I also included some of our Sparkles too! I kept this card very basic.


For my next card using this sketch I decided to tilt the back two squares and change the focal rectangle to a circle. I kept the other elements the same but by changing those two items it creates a totally different look and feel to the card. I used Springtime Friends for this card.


Lastly I wanted to use this sketch for an altered item. I used one of the card boxes by Boitatou. For this item I needed to increase the length of the sketch. You will notice I needed to space everything a bit further apart. For this on the sketch I changed the circle in the bottom left to a square for my sentiment. I also changed the bottom right rectangle to a bow and moved the other grey piece that runs the length up so it runs behind my image. For this box I used Dandy Lion and Rain or Shine.


Well hoped you like what I did with this one sketch and hope you can try this too!

Cheers!
Alexis :)

07 November 2016

KRAFTY TIPS & TUTES - HOLIDAY ORNAMENT TAG

Hello!  This is Krafty Girl Becky from Cards by Becky 
with a guide for how to make a holiday tag,
which can be used as a gift tag or ornament for the tree!

SUPPLIES:
KKS Christmas Blessings Sentiments set ( just released - new! )
Melissa Frances Large Frames, purchased from Amazon.com
Paper, Memento Ink Pad, etc.
 
STEP 1
Measure the paper to fit inside the frame and stamp.
I used Memento Brown Ink to make it pop on the blue pattern paper.


STEP 2
Cut ribbon and fold in half to make a loop for hanging.
Tip!  Use pinking shear scissors to stop the ribbon edges from fraying.


STEP 3
Glue the paper to the frame and hot glue gun the ribbon loop.
 
Thanks for following along!   Happy Holidays!


OCTOBER  -  NEW RELEASE
Now Available!   Kraftin' Kimmie Stamps Shop
___________________________________________________________________
 
  Check the KKS Blog for more Tips & Tutes!
 
 http://kraftinkimmiestamps.blogspot.com/search?q=tips&max-results=20&by-date=true