Hey yall! Krafty Girl Tangii here with today's Krafty Tute. You've been asking for it and I've finally gotten it done for ya... today we are going to CREATE A WATERMARK, and then we'll ADD IT TO A PHOTO!! For this we are going to use PicMonkey... a free, web-based (means nothing to download) photo editing software that's VERY easy to use!!
Let's get started... first off let's go to
www.picmonkey.com. Our first step will be to create the TRANSPARENT BACKGROUND.
If you hover your mouse over COLLAGE the CHOOSE PHOTOS TO COLLAGE window (that gray box) shows up. Now just click one one of those OR COLLAGE WITH THESE photo's (click any one of them).
Above is what your screen will look like. On the far left click on the LAYOUTS tab (I've circled it).
Now Click on YOUR OWN (circled above) and a single grid will show on your screen.
Next, let's click on the BACKGROUND tab on the far left (it looks like a painters palette, I've circled it above). And check the box next to TRANSPARENT BACKGROUND. It may look like your grid disappeared, but it's still there inside those dashed lines. Now let's go ahead and save this. Click on SAVE, (I've circled it above). Give it a name (I chose PicMonkey Transparent background) and save it as a .PNG file. Then go ahead and click out of this workspace by clicking on the X that's on the left side of your workspace (I've circled it above).
Now we're back to this screen (this is the very first screen, remember?). This time we'll click on EDIT (I've circled it above). And then select your Transparent Background we created.
Once your Transparent Background is loaded, click on the OVERLAYS button on the far left (I've circled it, the butterfly). Now you don't have to add any shapes, your watermark can just be your name, but to be thorough here I'll add something. You can choose one of their designs or use one of your own, just be sure your own has a transparent background (no white box around it).
I'm gonna choose a heart, just click on the shape you want to use. If you are using your own shape, click on YOUR OWN at the top and then select the file. My heart is now on my screen and the OVERLAY bos opened on top of my workspace. I'll click on COLOR 1: (I've circled it above), and when I do the color palette opens up, I'm going to use the grays on the far left.
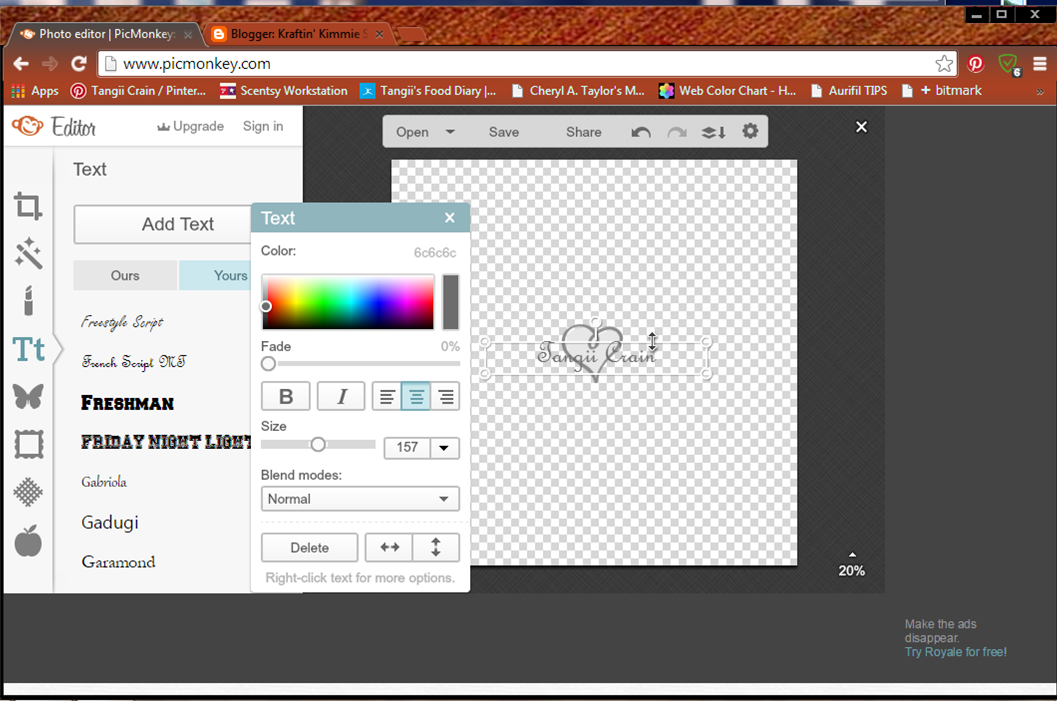
Now let's get your name on this thing!! Click on the TEXT button (I've circled it on the far left). You can either use their fonts or click on YOURS (again it's circled above) and use your own, I've chosen FRENCH SCRIPT. Click on the font you want and click on the ADD TEXT button. The TEXT dialog box will pop up as well as a TYPE YOUR TEXT HERE box on your workspace.
Click inside that box and start typing. Once you've typed your name, highlight it then you can change the colors, play with fonts and adjust the font size, etc. I've used another gray here. Once you're happy with the font look you can move the text box in to position, I've centered mine on the heart.
We're almost done!!! The next thing we want to do is CROP the TRANSPARENT BACKGROUND. So to the far left, click on the BASICS tab (I've circled it) then click on the CROP. Now you'll see a highlighted box around your image with anchors on each corner, grab those anchors and bring that highlighted box closer to your image.
Now let's save that baby!!! Click on SAVE in the upper middle of your workspace, to the far left be sure that it says .PNG as the file type (circled above), then finish saving! By saving it as a .PNG your image will keep it's transparency. Congratulations!! You've just created your own watermark!!!
Now let's get that added to artwork photo's! Be sure that you've closed your watermark we were just working on.
You should be on the beginning/main screen now. Let's click on EDIT (circled above), and open your card/artwork image.
I'm using a card I made a bit ago and it's already watermarked (you should NEVER put your artwork on the internet without a watermark). Let's click on the OVERLAYS tab (circled above) and then choose YOUR OWN (also circled above), open the watermark we just created.
I've moved mine to a spot that'll be easy for you to see, you can put it anywhere at this point. Use the FADE slider (circled above) to adjust , between 30% and 60% will probably be ideal.
Place your watermark wherever you want it (it should be on top of the card/artwork somewhere, though some of it can "hang over" to the background (you can see this on my original watermark in the lower right corner). I've put my new watermark close to his hat. At this point you can adjust that FADE some more if you want to, you can also re-size if needed. All you have to do now is SAVE!!! and you are DONE! I know it seemed like alot of steps here, but that's only because I like to show every little step for those who don't use the computer as much. Once you've gotten the hang of this you can do lickety split!!! Also, that watermark we created is DONE, you can use it all over the place and you won't even need to create another one unless you want to :)
I will keep watch on comments on this post as well as the Krafty Friends FB page in case anyone has any questions. Happy watermarking!!!


Thanks I needed this! Now to find the time to sit and try it step-by-step! : )
ReplyDeleteLet us know how you do :)
DeleteThank you so much for this tutorial! I've been unhappy with my watermark recently so I can't wait to make my own!! :)
ReplyDelete