

Good morning everyone!


Krafty Girl Melany here with an ink blending Tips and Tuts!
Today, I'm going to show you some of my favorite tips for ink blending with stencils.
For color blending, I like to use my trusty Strathmore Mixed Media cardstock

I cut 2 3x5 1/2 rectangles (I want to make 2 tags)

Did you know that when doing them by yourself, cutting one corner, then flipping it over and taking it as a guide is the easiest way to have even sides


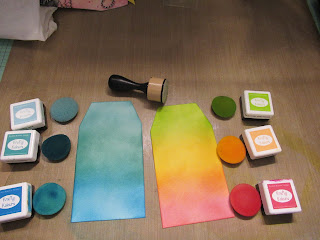
Choosing 2 color combos. One tone on tone and one more colorful. On the colorful one, you have to avoid to put two colors that will produce mud. Here, on my second tag, I separated the green and the pink. Yellow blends well with those two colors. On the first tag, I used SALTY SEA, LOVELY LAGOON and MERMAID MELODY. On the second tag, I used CHARMING CHARTREUSE, MORNING MARIGOLD and RASBERRY ROSE

I always start from he outside to the inside, and always from the lightest to the darkest
I put a few coats of inks, until they blend like I want them to

Time for stencils. I like to do tone on tone or choose one of the color (usually the darker one). On the first tag, I used LOVELY LAGOON for stenciling

I used TRIPPY TRIANGLES and PARTY TIME BANNERS

I like to outline my stenciling. I find that it makes it pop

Inking the edges in black ties everything together

I don't always add splatters, but when I do, I do it before adding my sentiment or my focal image

Time for sentiments. I used the PARTY TIME SENTIMENT stamp set

What I like about this stamp set, it's that it's so versatile! One stamp set, two tags, two different looks!

The sentiment on the left have been stamp with LOVELY LAGOON and the one on the right have been emboss
Inking reinforcers to make the match the tags. I outline thme to make them pop just a bit


Time for final touches like twine, ribbons, KRAFTY DOTS
...and...we're done! Here's the final result

I can't wait to see your ink blending projects!
Have a great day!
Wow, these are fabulous. Thanks for sharing.
ReplyDelete