

Hi everyone!
Krafty Girl Melany with you. How is your party going so far? Let the fun continue with this step by step art journal page.
Here's what I made and I will show you how I made it:

I did an image tranfer on a distressed cardboard. I used 4 KKS stamps set, plus a stencil! So, follow me and let's see what you'll come up with!
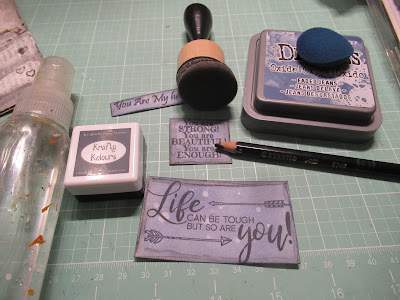
1) Here's all the stuff I used to make this. I added few bits and pieces as I was going:
-cardboard
-gesso
-matte gel medium
-water
-Distress Oxide Faded Jeans
-thread
-some washi tapes and few embellishments
-Granite Grey Mini Cube
-Wicked Black Ink Pad
-Harlequin Stencil
-Hearts and Stars stamp set
-You are Super stamp set
-Girl Power stamp set
-Happy Thoughts stamp set
-Krafty Basics Dots

2) I started by spraying some water on my cardboard to help me on the distressing part

3) I ripped some parts and glued paper and tape for texture

4) I added gesso and wiped it here and there to give it a white washed look

5) I used a Stabilo pencil and a wet brush to make some shadows

6) Then, with my Harlequin Stencil, my Granite Grey Mini-cube and my ink blender tool, I added some details here and there

7) This is the tricky part (but so much fun!): the image transfer! I printed my image on my Ink Jet printer (my pic is at 5x7). For this, you'll need matte gel medium (and a brush), water and for best result, a brayer to burnish your image very well on the cardboard

8) Add your gel medium on the cardboard (where your pic will go) and on your pic itself (on the printed side). Then, put your image on the cardboard and let it sit few minutes (you can help it with your heatgun if you want to)

9) Try to peel off the "white part" of the paper. If the color stays on the cardboard, you can go ahead and peel it all. If the color is still on you image, wait a bit more. When it's ready, peel the "white part" very carefully. Then, spray a bit of water on your image and begin to rub (VERY GENTLY) to take off all the little paper parts that were left

10) It's a bit hard and you might have some distressed edges and some holes here and there. But embrace it! It's kind of part of the look we are going for! As you can see on this picture, while I was waiting for the tranfer, I outlined some of the diamonds of the Harlequin Stencil to make them pop.

11) Time for some Hearts details so I grabed my Hearts and Stars stamp set with my Wicked Black Ink Pad. I added white details with my white Sharpie poster paint

12) For my sentiments, I wanted some strong and positive ones. So I used one on the You are Super stamp set, one on the Happy Thoughts stamp set and another one on the Girl Power stamp set

13) To make my sentiments match with my pic, I inked them with Distress Oxide Faded Jeans

14) I wanted to make them look a bit distessed so I flicked a bit of water, used my Stabilo pencil all around and inked the edges with my Granite Grey Mini-cube
15) I hand stitched my sentiments and on my pic for added interest


16) I added washi tapes accents

17) Then, I grabbed my Hearts and Stars stamp set (again!) with my Granite Grey Mini-cube to stamp some stars embellishments

18) I used my Krafty Dots to add some textured highlights here and there

19) Time for the finishing touches! I inked the edges of my art journal page with my Wicked Black ink pad and then made some black, white and blue splatters. Et voilà!


I hope you had fun and can't wait to see your own page! Come to show us on our Krafty Friends FB page. And stay tuned for more krafty fun for the rest of the day!
Krafty Girl Melany with you. How is your party going so far? Let the fun continue with this step by step art journal page.
Here's what I made and I will show you how I made it:

I did an image tranfer on a distressed cardboard. I used 4 KKS stamps set, plus a stencil! So, follow me and let's see what you'll come up with!
1) Here's all the stuff I used to make this. I added few bits and pieces as I was going:
-cardboard
-gesso
-matte gel medium
-water
-Distress Oxide Faded Jeans
-thread
-some washi tapes and few embellishments
-Granite Grey Mini Cube
-Wicked Black Ink Pad
-Harlequin Stencil
-Hearts and Stars stamp set
-You are Super stamp set
-Girl Power stamp set
-Happy Thoughts stamp set
-Krafty Basics Dots

 |
All the Kraftin Kimmie supplies (I forgot the Krafty Basics Dots!) |

3) I ripped some parts and glued paper and tape for texture

4) I added gesso and wiped it here and there to give it a white washed look

5) I used a Stabilo pencil and a wet brush to make some shadows

6) Then, with my Harlequin Stencil, my Granite Grey Mini-cube and my ink blender tool, I added some details here and there

7) This is the tricky part (but so much fun!): the image transfer! I printed my image on my Ink Jet printer (my pic is at 5x7). For this, you'll need matte gel medium (and a brush), water and for best result, a brayer to burnish your image very well on the cardboard

8) Add your gel medium on the cardboard (where your pic will go) and on your pic itself (on the printed side). Then, put your image on the cardboard and let it sit few minutes (you can help it with your heatgun if you want to)

9) Try to peel off the "white part" of the paper. If the color stays on the cardboard, you can go ahead and peel it all. If the color is still on you image, wait a bit more. When it's ready, peel the "white part" very carefully. Then, spray a bit of water on your image and begin to rub (VERY GENTLY) to take off all the little paper parts that were left

10) It's a bit hard and you might have some distressed edges and some holes here and there. But embrace it! It's kind of part of the look we are going for! As you can see on this picture, while I was waiting for the tranfer, I outlined some of the diamonds of the Harlequin Stencil to make them pop.

11) Time for some Hearts details so I grabed my Hearts and Stars stamp set with my Wicked Black Ink Pad. I added white details with my white Sharpie poster paint

12) For my sentiments, I wanted some strong and positive ones. So I used one on the You are Super stamp set, one on the Happy Thoughts stamp set and another one on the Girl Power stamp set

13) To make my sentiments match with my pic, I inked them with Distress Oxide Faded Jeans

14) I wanted to make them look a bit distessed so I flicked a bit of water, used my Stabilo pencil all around and inked the edges with my Granite Grey Mini-cube

15) I hand stitched my sentiments and on my pic for added interest


16) I added washi tapes accents

17) Then, I grabbed my Hearts and Stars stamp set (again!) with my Granite Grey Mini-cube to stamp some stars embellishments

18) I used my Krafty Dots to add some textured highlights here and there

19) Time for the finishing touches! I inked the edges of my art journal page with my Wicked Black ink pad and then made some black, white and blue splatters. Et voilà!


I hope you had fun and can't wait to see your own page! Come to show us on our Krafty Friends FB page. And stay tuned for more krafty fun for the rest of the day!
Fabulous mixed media page!
ReplyDelete